ShopDreamUp AI ArtDreamUp
Deviation Actions


Suggested Deviants


Suggested Collections


You Might Like…


![NVi Texures 020]](https://images-wixmp-ed30a86b8c4ca887773594c2.wixmp.com/f/320e83a0-0c43-4537-bb07-952498fd703b/d89nitq-d2bd0c41-70c8-430b-9a9e-48e37019e7db.jpg/v1/crop/w_184,h_184,x_25,y_0,scl_0.15333333333333,q_70,strp/nvi_texures_020__by_layna_lazar_d89nitq-92s-2x.jpg?token=eyJ0eXAiOiJKV1QiLCJhbGciOiJIUzI1NiJ9.eyJzdWIiOiJ1cm46YXBwOjdlMGQxODg5ODIyNjQzNzNhNWYwZDQxNWVhMGQyNmUwIiwiaXNzIjoidXJuOmFwcDo3ZTBkMTg4OTgyMjY0MzczYTVmMGQ0MTVlYTBkMjZlMCIsIm9iaiI6W1t7ImhlaWdodCI6Ijw9NjYxIiwicGF0aCI6IlwvZlwvMzIwZTgzYTAtMGM0My00NTM3LWJiMDctOTUyNDk4ZmQ3MDNiXC9kODluaXRxLWQyYmQwYzQxLTcwYzgtNDMwYi05YTllLTQ4ZTM3MDE5ZTdkYi5qcGciLCJ3aWR0aCI6Ijw9MTAyNCJ9XV0sImF1ZCI6WyJ1cm46c2VydmljZTppbWFnZS5vcGVyYXRpb25zIl19.u9L1jpFnPh8WvRz-kxLYcEb7_bMZu_mYcHcGfrGmIeo)
![NVi Texures 020]](https://images-wixmp-ed30a86b8c4ca887773594c2.wixmp.com/f/320e83a0-0c43-4537-bb07-952498fd703b/d89nitq-d2bd0c41-70c8-430b-9a9e-48e37019e7db.jpg/v1/crop/w_92,h_92,x_13,y_0,scl_0.076666666666667,q_70,strp/nvi_texures_020__by_layna_lazar_d89nitq-92s.jpg?token=eyJ0eXAiOiJKV1QiLCJhbGciOiJIUzI1NiJ9.eyJzdWIiOiJ1cm46YXBwOjdlMGQxODg5ODIyNjQzNzNhNWYwZDQxNWVhMGQyNmUwIiwiaXNzIjoidXJuOmFwcDo3ZTBkMTg4OTgyMjY0MzczYTVmMGQ0MTVlYTBkMjZlMCIsIm9iaiI6W1t7ImhlaWdodCI6Ijw9NjYxIiwicGF0aCI6IlwvZlwvMzIwZTgzYTAtMGM0My00NTM3LWJiMDctOTUyNDk4ZmQ3MDNiXC9kODluaXRxLWQyYmQwYzQxLTcwYzgtNDMwYi05YTllLTQ4ZTM3MDE5ZTdkYi5qcGciLCJ3aWR0aCI6Ijw9MTAyNCJ9XV0sImF1ZCI6WyJ1cm46c2VydmljZTppbWFnZS5vcGVyYXRpb25zIl19.u9L1jpFnPh8WvRz-kxLYcEb7_bMZu_mYcHcGfrGmIeo)


Featured in Groups


Description
Final image can be viewed here > [link]
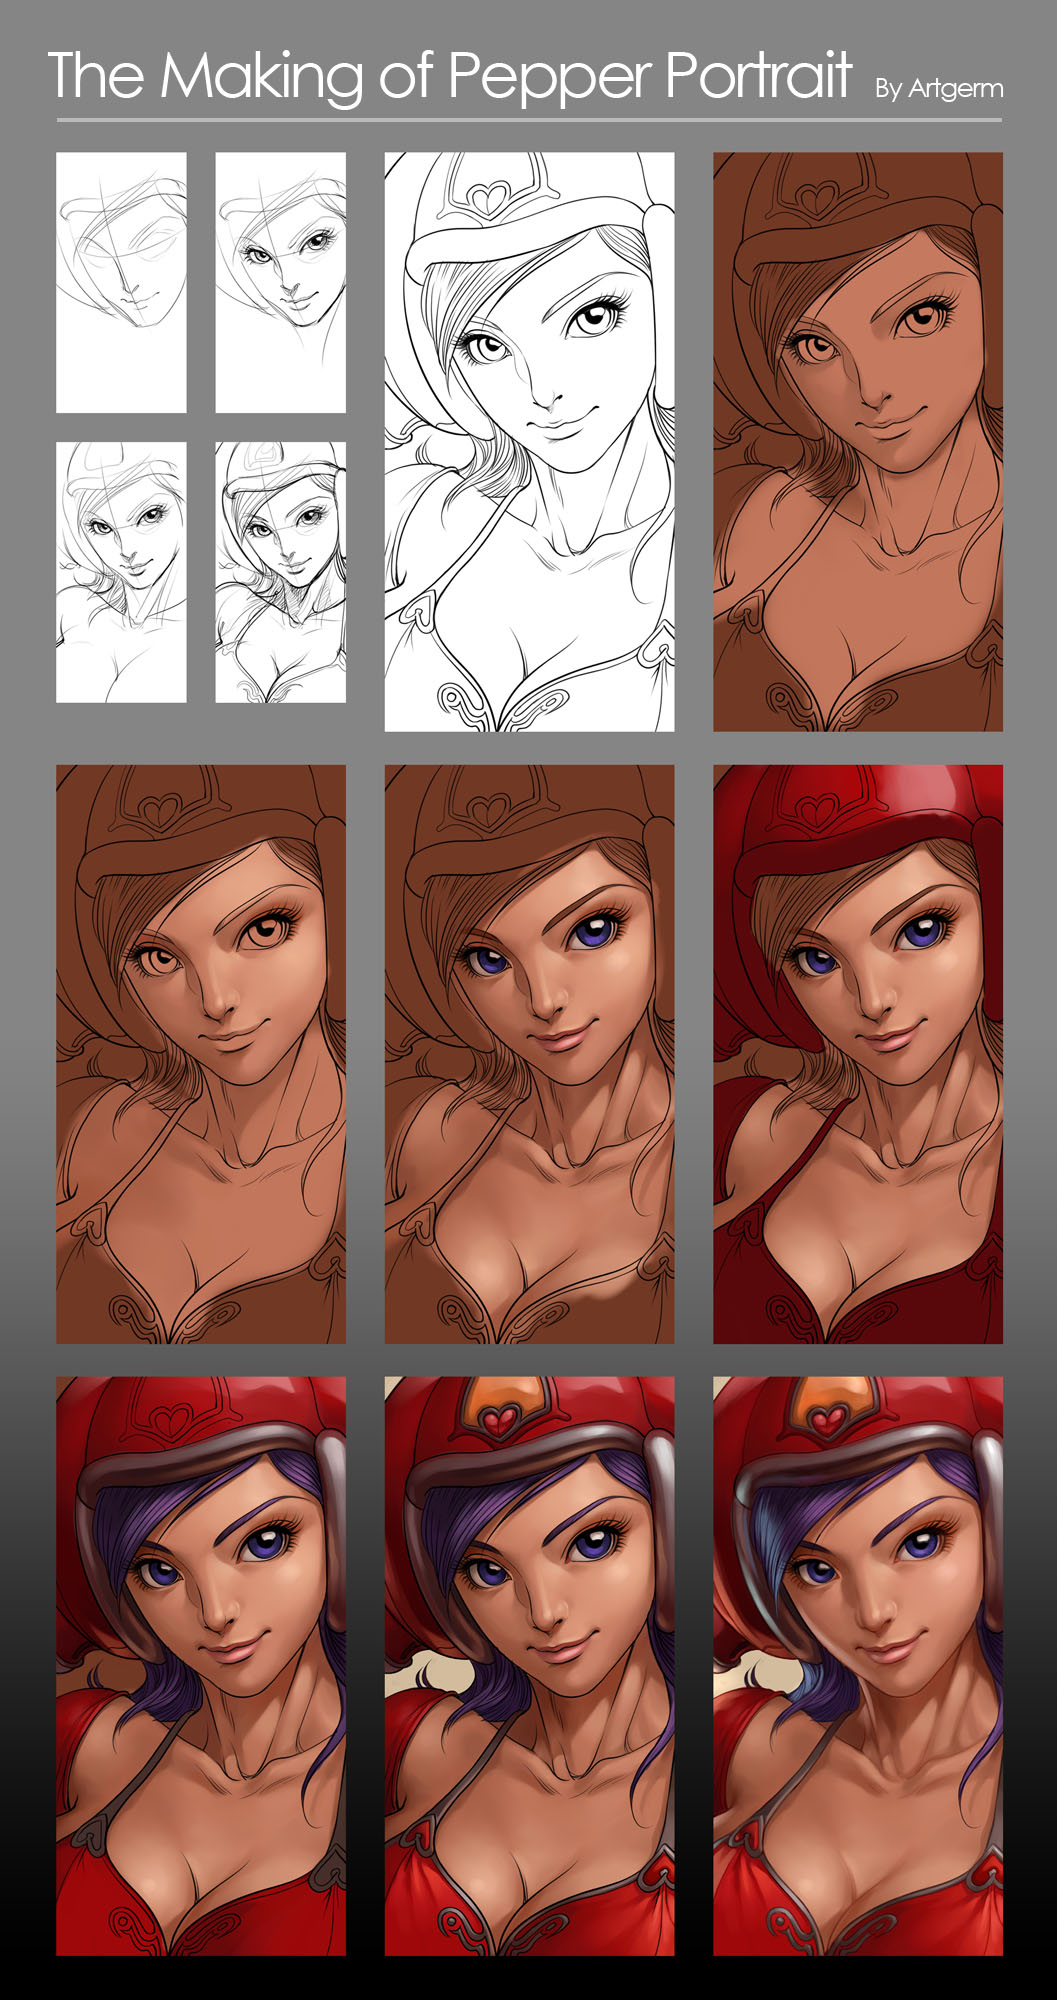
These are the steps I take for this style:
1) Start off Simple construction lines for her face and overall composition. 10-15 mins
2) Once the sketch is done, set it to 10% opacity and add a new layer on top of it for the clean lineart. 30 mins
3) Remove the sketch layer, add a new one underneath the lineart and throw in some flat colours, usually 60-70% dark of the local colours.
4) After deciding the light direction, start adding values to her face without focusing too much on the details. Pay great attention to the tonal values.
5) Continue to expand the value range of her face, add in the cast shadows and highlights.
6) Move on to her clothings
7) Define the reflective surface of her helmet with reflection to the affected areas.
8) Finish her bra top and complete most of the details.
9) Set the lineart in multiply mode and tint it with the surrounding local colour.
Flatten the layers and blend some harsh lines with Painter's blender - Just Add Water tool.
Add the secondary light source from the left.
Final cleanup and minor adjustments of her face - I shrinked her eyes a little with Photoshop's liquify tool.
Total time - 4 hours. No reference.
Image size
1057x2000px 419.39 KB
© 2006 - 2024 Artgerm
Comments506
Join the community to add your comment. Already a deviant? Log In
that's so aweome !